Every now and then, we come across questions like this. Some new Meta Quest 3 users are unsure about the proper way to shut down the headset. As a result, they often just take off the headset during a game or virtual experience and set it aside. However, this can lead to rapid battery drain because the headset isn’t properly powered off.
Here, we’ll show you the correct and proper way to shut down the Meta Quest 3 — or, as we like to say, in a more gentle manner.
1. Find the Power Button
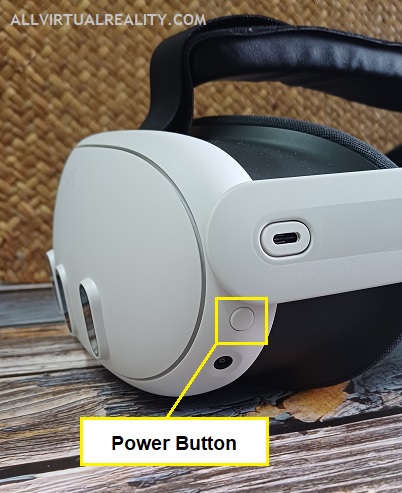
If you notice, there is a button at the left side of the VR headset. The name of the button is “Power Button“. Figure 1 below show where it the button is located.

2. Press the Power Button
Next, press the Power Button for about two to three seconds. If you press it for too short, then it just go to sleep.
3. Headset Power Appears
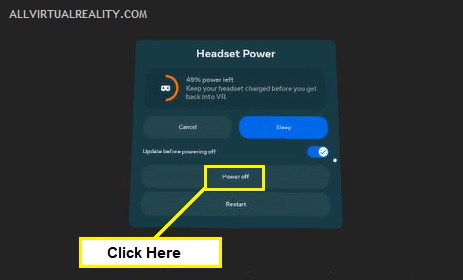
Next, you can see a pop-up box appears in the middle of the very dark virtual environment. The pop-up is also called “Shut Down Menu“. You can see the title as “Headset Power” and it comes with few options for you to choose.
4. Select Power Options
Since you want to shut it off, you click on the “Power Options” button. Kindly refer to Figure 2 below.

5. Select Power Off
Then you click on the “Power Off” button like in Figure 3 below. Normally, we also untick the “Update before powering off” to ensure clean shut down.

6. Notification Message Appears
The notification message “Power Off: Shutting Down” will appears immediately. It will appear in short time frame for around one or two seconds.
7. Shut Down Completed
Finally, all you can see is just pitch black. This means that you have successfully power off or shut down your Meta Quest 3.
Lastly…
That’s all for now guys. Hope this simple tutorial can help the beginner and newbie of Meta Quest 3. If you would like to see other tutorials, you can check it here. See you in another tutorial!


